Wednesday 9 February 2011

Codes & Conventions: Fusion Magazine

Codes & Conventions
Fusion magazine
Front cover and Contents

Front Cover
1. Colour scheme (white, red, black)
2. A sub title under magazine name.
3. Title takes up top third.
4. Picture of person takes up two thirds of the front cover.
5. White writing stands out.
6. ‘Words of Wisdom’ appears several times on image.
7. Basic plain image to attract you to magazine.
8. Shows what issue it is. (issue 1)

The colour scheme is used to make the text stand out and not make the magazine look too complicated. Allows the reader to focus on the main points raised in magazine as text all falls on the left third of the front cover. The 3 main colours may also be based on the school colours.  Red adds a sense of danger and rebellion making it stand out.
The sub title under the magazine name is always used as it allows your eyes to be drawn to the title. The main title takes up the top third of the magazine so the reader’s eyes are drawn to the name of the magazine first. The writing is also white so it is a major contrast to the red background. The word fusion sounds high tech and really gripping to the reader; it sounds like the magazine is being fused together.
The picture of the person takes up the whole bottom two thirds of the magazine showing a maybe rebellious teenager; picture is also simple so it is basic bold colours like the other colours.
The use of white writing makes the readers eyes focus on the points raised as white is a stand out colour from red and black.
The slogan ‘Words of Wisdom’ appears several times as a frontal layer on the cover, it tries to show that the boy is saying these words.
The basic plain black image attracts the reader to the magazine as it is bold and easy to see. The use of the colour black allows the reader to see the image but also the text at the same time.
The magazines front cover also has a issue number showing what issue it will be, this is to keep each issue of the magazine separate and allows it to have its own edition in case it has collectors.
                             

Contents
1. Creative rainbow colours.
2. Big bold title (contents)
3. Laid out in 3 columns.
4. Rainbow line at bottom to separate out contents from next page.
5. Recycle logo
6. Caset tape with rainbow shaped image.
7. Headings to describe what will be on each page of the magazine.

The rainbow colours are used to add a sense of creativity and to make it look more modern and eye catching. Furthermore the big bold title (contents) stands out from the light background colours to show the reader what page they are reading, as it is the biggest font on this page.
Under the heading contents the description of what is on each page in arranged in a 3 column contexts, this is to make it easier t read and isn’t complicated to read.
At the bottom of the contents page there is a rainbow line to separate it out from the other pages so the reader knows that is the only contents page.
By adding the recycling logo in the bottom right hand corner it shows that this magazine is printed with 100% recycled paper; promoting recycling in the school. The addition of the caset tape adds a retro side to the magazine and makes the school seem creative. The caset also has pink shades of colour beaming out from it; this maybe making a statement and showing that the school is very creative in music.
The headings under each page title allows the reader to have a little description of what will be on each page; like a brief summary.


Monday 7 February 2011

My School Magazine Evaluation

Front Cover
1. Colour Scheme. 2. Smaller font under title of magazine.
3. Picture of person takes up bottom two thirds.
4. Magazine title takes up top third.
5. Black and blue font stand out from low opacity back ground. (school colours)
6. School logo in bottom corner.
7. Bold blue top on girl.

For my magazine front cover I decided to use a blue colour scheme to connect with the school colours and keep it neutral to make the image of the girl stand out. I used the smaller font under the title of the magazine to make the word students stand out and make it appealing to the student forum. By using blue for the smaller font it connects with the school colours and makes it more attractive to all at the school. The picture of the girl takes up the whole bottom two thirds of the front cover which makes the student the center of attention; which is what I was aiming for. Furthermore the magazine title takes up the top third, by doing so it attracts the reader to the main focus of the magazine. I chose a low opacity background to make the black and blue font stand out from the school building and this made my front cover look a little more professional and better thought out. I chose to put the school logo in the bottom corner to show that Whitley Bay high school was the school magazine i was making. On the other hand by making the girl wear a blue hoody it links well with the school colours and makes the girl connect with the scheme of the front cover.
By using the inspiring ideas from school magazines like fusion it allowed me to understand that there is normally a plain 3 colour scheme; so the reader can read and understand each section of the front cover with ease. Also researching into the school magazines names and font size I realised that most of them have titles that take up the whole top third, as a way of making the readers eyes focus on that before anything else.

Contents Page
1. Black and white computer in background.
2. Used only 3 colours (blue, red and black)
3. Diagonal photos in bottom third.(in colour)
4. The contents title takes up top third.
5. Plain white background.
6. Italic red font as sub heading under Stress Advice.

Studying my contents page I made the decision to make the computer take up the right 2 thirds of the contents page and also made it black and white. Doing so allowed the other colour images to stand out and give a variety of media techniques in my contents page. I also decided to make the computer have a low opacity allowing the readers eyes to be mainly focused on the page headings and the colour images at the bottom third of the page.
By only using three colours it adds a sense of professional touch to the contents and doesn't detract the readers eyes away from the main contents headings on this page.
I added diagonal colour images in the bottom third to give it a additional bit of creativity, the images also show pieces of artwork younger students have produced and them in the middle of creating new pieces of artwork; this gives the reader a image of how the school is as a whole.
The title 'contents' takes up the top third of the contents page making the readers eyes attracted to the title before looking at the images.
Furthermore the plain white background makes the blue font, black and white computer and the colour images at the bottom of the page stand out instead of it being discussed in the background. While looking at examples of school magazines I noticed they added sub-headings under the contents number titles. I decided to add this into my contents and used a red font to make it stand out from the blue and the black tones from the other writing on the same page. This worked out to be very effective and could be used in my future projects.

While researching some alternative school magazines contents pages I realised that they mainly have quite plain coloured backgrounds; this technique was used so the text could be read easily and was more eye catching. While looking at some other basic school magazines I saw that most of them had images representing different sections in the magazine, almost like a little peak into what was going to feature in the school magazine.

What I have learnt about technologies from the process of constructing this product

While using the camera I had quite a tough job getting the aperture and shutter speed at the correct setting, this sometimes made my photos quite blurry and not as sharp as I wanted. Furthermore taking the medium close up shot wasn't a great deal of work. The natural light coming through the window to the left of my model was a prefect contrasting brightness, showing the harsh shadows and giving my model a nice glow. After taking the photo I went into Photoshop and adjusted the hue and brightness/contrast just to add a little more colour to my models hands and face.
While constructing my front cover and contents page on Photoshop I took into account the rule of thirds and tried to lay my images and text in the same way to give it that professional edge. I used the magnetic lasso to give me a nice smooth edge around my models body so it looked like she was sitting inside the magazine. I also used tools such as the text tool for my font sizes/font and for writing out text. This tool was very good for creating a correlating colour scheme of blue, black and white; to match the school colours.
On the other hand my main tool for constructing my school magazine was the layering. By using this it allowed me to move around certain parts of the front cover/contents if I wasn't happy with were they were. If I didn't layer my magazine I wouldn't be able to move around any of my images as easily because they would all  be compressed into one. Layering was a great way of structuring ideas but then being able to move them around if I wasn't happy with certain aspects of my school magazine.

My School Magazine Front Cover and Contents Page


Sunday 6 February 2011

Dairy Entry Week 1: School Magazine

On the first day (31st January) I was researching different types of school magazines to try and get a brief idea on how to lay out my magazine, and what the correlations were between each magazine.
1st February – I then made a log in to use a program called blogger to keep all my work on for it to be easily accessible. Also on this day I started taking photos of students studying and also landscape shots of the school grounds; these shots were similar to ones in the researched magazines. These photos turned out well, but I was still learning how to use the aperture and change the shutter speed; this made some of my photos slightly blurry.
2nd February – I started using Photoshop and was slowly creating my magazine around the codes & conventions of example school magazines. I used the opacity tool to create a slightly see through layer  of the school in the background; this made my font stand out and also made the title of the magazine (Students Monthly) stand out. I used the magnetic lasso tool a lot to cut out my front page picture and transfer it to being the top layer on the school. This image was a picture of a student studying at a desk.
3rd February – I then moved on to choosing my font and colour, this made me use the text tool a lot more and allowed me to create a simple stand out title.
4th February – I decided to start on my contents page and was thinking up a few ideas while looking at my draft.
I firstly decided to place an image of a school computer on the right hand third of the page, to do this I used the magnetic lasso and the rubber to cut out the image from its background. By placing the computer in the right hand third this gave me more space to complete the contents page with text to the left hand side. I also made a quick last minute decision to change the computer to black and white to make some other images stand out; to do this I used the saturation tool which gave the computer a greyish black effect.  
5th February – On this day it was basically all based around putting in text and using the text tool for this. On the front cover I used a blue font to match with the schools colours and to make it stand out from the faded image of the school in the background.
I added in small sentences like e.g. Top Revision Tips For 2011.
To give the reader an insight to what will appear in the magazine, by doing research this appeared to be a very popular technique to entice the readers of other school magazines.
I also used the same colour and font for the contents pages text also, while not making it look too busy. I used the underline tool to make each page number and additional information for that page look together and simplistic so it didn’t merge with any of the other sentences. Finally after doing so I added some smaller images to the bottom third of the contents page to show what goes on in my school and what there is to get involved with. To do so I used the move tool and rotator on the corners of the pictures to make them stand out and give the contents page a bit more diversity.

Friday 4 February 2011

Diary Entry Week 2: Research into Music Magazines

Monday 7th February- On the first day I spent time researching into what magazine genre i wanted to do, while looking through magazines such as Kerrang!, Source and Clash I realised these magazines weren't for me. So I decided to look at magazines such as NME, Mojo, Q and Rolling Stone as they were more indie pop which is where I wanted to head with my music magazine.
Tuesday 8th February- As I had a more clear idea of what magazine genre I wanted to do I went into researching the different codes & conventions of NME. This worked out to be very helpful as I wanted to base my magazine on this product. I mostly looked at the front covers, contents pages and double page spreads which gave me alot of inspiration.
Wednesday 9th February- On the third day of researching I looked into Q magazine which was another potential magazine that I would base my own music magazine on, while flicking through the magazine I really liked the basic plain backgrounds to make the headline stories stand out; I also loved the white, red and black colour scheme which i may also use for inspiration.
Thursday 10th February- I then moved on to looking at the music magazine Mojo which was alot more old school with its layouts and presentation. But what I did love about this magazine was its individuality, the designers didn't really stick to the typical codes and conventions of a regular music magazine for example: the designer of the Paul McCartney interview used 2 columns instead of the normal 3. I realised after researching that Mojo is a very individual company and thrives on questioning the standard codes & conventions. This magazines style may come in handy if I want to add my own touch to my music magazine.
Friday 11th February- On the final day I did my final piece of research on Rolling Stone magazine as the plain simplistic background design attracted me to it. While looking through this magazine I loved the fact it was very varied and didn't always focus on the headlining acts of today a lot like NME and Mojo. This idea may be a useful idea if I decide to do an interview of an older singer. Some parts Rolling Stone didn't appeal to me as much as the other researched music magazines though, while looking through magazines such as Q and NME I realised they were more what i was looking for as eye catching ideas for my own music magazine.

Thursday 3 February 2011

Analysis of 5 Front Covers

Mojo
For this Mojo front cover analysis I decided that the layout in my opinion was a little too crowded and had too much going on. For example the main artists on the front of the cover don’t seem to be very recognizable, so the designer would have to make their name stand out a lot more; but the band name ‘Nirvana’ seems to blend in with the background image too much. This is also the case for the writing down the left and right hand sides of the page, as  the picture is saturated it is harder to pick a basic colour like black or white as a font colour. On the other hand I really like the use of layering in this front cover, the band is in front of the magazine name (Mojo) and the band name overlaps the main image; this idea will probably be used on my front cover.
Furthermore this front cover does stick to the 3 colour scheme well as it only uses white, black and cream. These colours all complement each other well and are used to highlight certain sections of the cover. In this case the cream is used to highlight the artists and band names e.g. Nirvana and Johnny Cash. Whereas the white is mainly used for the sub headings below the artists name, and finally the black is used for extra advertising and highlights important information e.g. ‘Free CD and special anniversary issue’.  Following on from this the main font used for the cover is serif as I think it gives it a vintage/retro essence but the word ‘PLUS!’ in the bottom right corner is in sans-serif possibly chosen by the designer to attract the reader to the extra information as the eyes will be drawn firstly to the top 3rd. The font chosen for the magazine cover ‘Mojo’ is always going to be a memorable font just by being unusual; this has also been made white so the reader will still be able to see the name easily.
Finally the designer has added little touches like the peeling off sticker with a shadow to make the cover look that little bit more interesting; this shows an edgy side to Mojo instead of being very clean cut and neat. Similar to this is the image in the top right corner, this looks like a classic old photo shot sticking to the retro theme of the magazine. I love it how it is at a slight angle so it contradicts with the layout of the front cover; this could be an idea to make my cover look a little more eye catching.
NME
I really like the way this NME front cover is laid out and how the central focus point is the band member’s faces. The positioning of each member is roughly equal and no one is in front, this shows that each member has the same status in the band. This positioning of band members could be a good idea to use in my magazine to show the lead singer taking up the most of the frame or just being the furthest forward. Also since the band members are wearing all black it allows the designer to use colours such as white and red more easily; without worrying about writing not being seen. This idea works well for seeing the ‘new musical express’ and ‘THE XX’ writing more clearly.
Furthermore the font style that is mainly used on this NME cover is sans-serif as it’s a more prominent font style to use for big headings. On the other hand there are only a few examples of a serif font being used and this is above ‘THE XX’. On magazines such as NME serif fonts are normally used for speech or sub headings, this just makes the text stand out more from the rest as it is a quote. On the other hand the way the designer uses a bold small red line to separate out each heading works well for the reader as it will make it easier to read and follow. I also like the way a ‘+’ sign has been used instead of the word ‘plus’ just to make that cover a bit more interesting; the first impressions are always the best and the reader wants to see diversity and unusual symbols like the ‘+’.
This cover also follows the 3 colour scheme by using red, white and black which seems to be a popular colour group; as they seem to complement each other very well. Each sentence is separated by using different colored fonts in between to show where the new sentence begins and ends; I really like the was the designers have used this technique without making the cover look too crowded. Finally as a normal magazine would have there is a bar code in the bottom corner stating the price, date, NME website address and bar code number. This has been made clearly visible by contrasting with the band members black shirt.
NME

When analyzing this front cover I really like the way the photo is positioned on the page, the photo makes this front cover really eye catching but since it is black and white it also allows the reader to focus in on the magazine name and other headings around the image. The white background is a great choice to make the other text stand out surrounding the image, the more popular bands/ artists that are featured in the magazine are in a bold black sans-serif font and the minor ones are in a red smaller bold sans-serif font; this is a good technique to use to get the reader interested in the content of the magazine without even opening it.
Furthermore the ‘Pulp Return’ is the 2nd largest font size behind ‘NME’ as it is the main heading, this has also been made red to make it more eye catching and stand out. Above this there is a sentence ‘about f*#king time!’ this looks like it has been hand written which really adds to the cover; what I like about it is that it is a totally different font from what NME would normally use and it shows a more diverse style which shows that NME can be more creative with their choices of font and layouts. The hand written font has also been used on the ‘+’ sign and the dash (-) separating two headings. This writing almost ties in with the artist’s attitude on the cover and maybe the rebellious personality of the individual.
The popular colour scheme for NME to use are red, white and black which is exactly the same as this front cover, although it is a great choice if all these colours are used in the correct places. As an extra touch the designer has used a formal serif font in the top left corner to show the date and price, this really works well to show a little diversity between fonts and also makes the magazine appear more sophisticated to give it a good balance. Finally the bar code is placed in the bottom left corner as another indication of the price and date; I may decide to place the bar code in the bottom left hand corner also as it appears to be the area of the NME magazine cover that is least interesting.
Q

I really like the way this Q magazine is laid out as it doesn’t look too cluttered or messy. The large font in the bottom ¼ of the page is the obvious first focus point as far as the text is concerned, even though it is at the bottom of the cover it is still very eye catching because of the red bold sans-serif font. (a more prominent font to choose) The other text above this surrounding the head is a lot smaller as it shows authority over main stories, each separate sub heading above the main story is in either a different font or colour which really shows creativity and makes the cover seem a little more interesting. For this front cover the there are 4 colours used but this doesn’t make the cover look to busy, (red, gold, white and black) I think the gold makes the cover look a little more high class and POW!
The one part in not too keen on is the huge ‘Q’ logo in the red box in the corner; it just looks out of place and takes the eyes attraction away from the main image. If I was to choose this magazine layout I would decide to layer the logo behind the singers head instead of in front. Furthermore in the top right hand corner is a circle indicating a Queen Exclusive this is a good idea of choosing a different way of advertising a band or artist; instead of making almost a list down both sides of the page. Similarly Q use the ‘+’ sign instead of the word, this is also in a gold font possibly to show significance and makes the reader be drawn down the page instead of across.
Furthermore the main image is a mid shot of the lead singer (possibly) of a band takes up the majority of the page to show his authority or ranking in the band, the other member are in the reflection of his sunglasses; which shows they aren’t as popular. I love the way the designer has chosen to put the band members in the sunglasses as it just adds a little bit of creativity and style to the magazine cover. The colour as well is also really different because it’s not quite saturated and it’s not fully in colour; which makes it such an eye catching image.
Rolling Stone
For this Rolling Stone analysis I really like the way the background goes from dark at the edges and light in the middle showing Shakira to be the main focus point, the grey/silver of the background really matches in with the colour of the Rolling Stone font and adds to the metallic type vibe. On the other hand the sub- heading down the  left and ½ the right hand page are all in a serif font, with the artists names larger and bold and the brief descriptions under each artist in a smaller italic font;       (colour: black) this adds a more sophisticated side to the Rolling Stone cover. Between each sub heading are two silver lines and one bold black line, this is to make the reader feel as though the page is easy to follow and doesn’t look as cluttered; I may decide to use this in my own front cover as I feel as though my cover may look overcrowded.
 Furthermore the image of Shakira is covering the Rolling Stone magazine name which is very typical of the magazine to do as it makes Shakira look almost 3D and coming out of the page; I think this may be because of her stance. Furthermore the main image of Shakira is very well lit and just makes her skin look smooth and since her clothes are black this allows the white writing to pop out to the reader. This larger white text really stands out as it is one of the largest texts on the page, the thin black border really makes it clear to read and doesn’t blend in with the central white area of the background. By making this piece of text a question it makes the reader think also and wonder what will be inside about Shakira.
On the other hand one part of the magazine cover which doesn’t really fit in is the black square box in the top right hand corner, my reasons for this are because the font is sans-serif where as the text on the cover are all in serif font, it also looks to rebellious and untidy; which isn’t what Rolling Stone tend to do with their layouts. RS tend to be a little more neat and structured but by adding this angular box to the cover it just looks wrong. Finally like in all Rolling Stone magazines there is a small piece of text stating the price, date and issue of the magazine; this text is in black to stick with the typical trend of the cover. Overall this RS front cover isn’t as inventive or creative as Mojo or NME; this could make me head in a direction focusing on the other magazine styles like the ones previously mentioned.

Wednesday 2 February 2011

Analysis of 5 Contents Pages


Rolling Stone


For the analysis of the rolling stones contents page I would say it is very similar to Q’s contents by the layout. Firstly looking at the right hand side of the page where there is a image of Johnny Carson from when he was at the height of his career, below this image is a heading ‘Johnny Be Good’ this larger image is one of the top stories in the magazine after Johnny had just recently died. The sub-heading below describes briefly what the article is about to get the reader interested and gripped. Alongside the sub-heading is a page number ’32’ and a small purple sentence telling the reader that the story continues on that particular page this is also used on the smaller colour image to the left; I really like this idea because it really seems like the designer took the time to add in the small extra touches and shows the magazine is easy to follow.
On the other hand the same as Q’s contents page the left hand side of the page is a lot more text based. Rolling Stone have also stuck to the 3 colour scheme (purple, black and white) so the page doesn’t look to crazy; I will defiantly choose to only use 3 colours. Starting from the top where Rolling Stone has been abbreviated to RS which is in a bold black serif and sans-serif font (underlined) this allows more space to be made for the issue number; which is a funky sans-serif font and purple so it is eye catching. However below this heading there is a slogan “All the News That Fits” this is a great choice of words because it connects to the contents page as it is the page which tells you the main news in the magazine.
Furthermore the black line cutting across the left hand side of the page acts as a separation between the top articles’ in the magazine and the minor ones. Below this line there are purple page numbers in a bold sans-serif font and alongside each one is a heading or one word to sum up what is on these pages; (also in bold sans-serif font but black) by making the text bold it lets the reader clearly see what each of the 10 pages is about. I will make this a definite strong idea to take forward in my research and will possibly use it in my magazine, to make the layout easier to read. Following on from the page numbers there is a small blue website advertising rollingstone.com to make readers more involved in this company; the blue is a good choice of colour so it stands out from the other 3 neutral colours. Finally in the very bottom left corner there is a brief outline of who is on the front cover and who took the photos; this is good of Rolling Stone to do as it advertises their photographers and lets the reader know who was on the front cover in case they weren’t sure.

Q


Looking at this Q contents page I have come to really like the simplistic, clean cut layout. Starting from the where the main heading ‘contents’ is in a serif font and black to show the sophistication of this page, by using layering the designer added a light grey ‘Q’ in the background which still gives the reader some indication of what magazine they are reading; also there is a small issue number just under the word ‘contents’ just as an added professional extra. Further down the contents page there is a large image on the right hand side advertising a new or recent issue of Q with an artist on both; this lets the reader see an exclusive photo shoot for the next issue of Q. This image has then been layered by a separate image of another artist who has been cut out of his original background; this helps the designer to add anything extra they may need to put on the page if there is no other space. I really like the way the designer has chosen to layer the images up like this as it allows more bands/artists to be advertised and almost gives a sense of 3D into the page.
Furthermore this Q contents page has stuck to the 3 colour scheme by using red, black and grey this makes the contents page easier to read by having the white background to make these 3 colours seem more vibrant. In the very bottom right hand corner Q always put their logo as advertisement and a small black square with a page number in to show you which page you are on; which is in a sans-serif font. Above this there is a faded red box which advertises the Q website and MySpace page; this just makes the magazine look that little bit more interesting while sticking to the colour scheme.
However the right hand side of the page is a lot more text based and starts off with ‘on the cover >>’, this is a great idea by the designer to let the reader actually know who was on the page before and where the interview with this artist is in the magazine. The font for the standfirst’s heading is in bold sans-serif and the small paragraph below is in grey and serif to show some separation between both. Lower down there are the listings of 7 page numbers with artists names alongside the numbers; these are both in a black serif font with a small line between each one so it doesn’t look as plain. Under each page number there is a description of what is on each of those 7 pages listed; this is also in a black serif font but is smaller so it doesn’t draw any attention away from the page numbers and headings. I may use this technique in my contents page as it is a great way of keeping the reader interested in certain parts of the magazine before others.

NME


When first looking at this contents page I thought it was a lot more different from the others I had analyzed, this NME contents page looks like it would appeal more for a younger teenager audience. My reasons for this are based on the untidiness of the layout; pictures are diagonal, there are stickers and £2 off ads in the corners and it all just looks a little messy. The designer may have chosen to do this based on the fact that teenagers are messy and tried to resemble their personalities through the contents design. I’m not really too keen on this layout and I don’t think the pink, white, black and yellow are great colours for the colour scheme. The font style that is only used is sans-serif, but this has been broken down into fonts similar to it e.g. Lucinda Handwriting which almost makes the page look like a student has written it.
To try and section off the ‘club NME this week’ section from the ‘Club NME Chart’ there is a thick black line separating the two, this makes the page look a little more organized. On the ‘club NME this week’ side there is a list of who is headlining in cities from Leeds to LA these cities are all in there own separate font and colour(white) to make them stand out against the black background. The ‘Club NME This Week’ is also in a sans-serif font and has been made bold to show that it is the main heading. Below this there is a small image which shows two band members and listings of future NME club tours; this lets the reader know any other vital pieces of information they may need to know before reading the main body of the contents.
On the other hand this contents page differs from any other, where some contents pages have a good indication that you are reading the contents; this NME one doesn’t at all. The idea of not putting a bold heading before the main body of the contents just seems weird and may make the reader just skip past it without realizing; I’m not too sure if this idea will work in my contents page as I would like the reader to easily be able identify what page they are on. Moving down to the main image in the centre of the page which is at an obscure angle to differentiate from the others, the image shows the reader that they are the main band in the spot light on that particular day and by making it the central focus point the readers eyes will be immediately drawn to it.
The contents numbers are displayed as a sans-serif font again and are bold to make them more prominent to the reader. The headings to go with each page number are all in a pink graffiti like font to show the rebellious side to teenagers. And any other information I indicated in a black font. Finally the stickers on the right hand side of the contents are there to give the reader a little bit more information about NME; in this case it’s NME TV. The pink sticker almost looks like it has been peeled off slightly round the edges, this just adds that little something extra to the page to make it look good and link to the teenage audience.

NME


While analyzing this NME contents page I realized really loved the way each aspect of the page way laid out and positioned. Firstly the heading of the magazine contents is ‘inside this week’ I really like this because it adds a sense of variation instead of using ‘contents’ as you’re heading and it just makes it look that little bit more interesting. The font used for the heading is in Times New Roman (serif font) and is in black to contrast with the white background. Secondly the designer has organized the pictures in a way to show which artist is the main headliner e.g. all the smaller images are surrounding the larger image in the center of the page. This technique is a good idea to make the readers eyes focus on specific parts of the page before looking at others; might be a useful idea for my contents page. Furthermore the font choices are very variable, each artist has their own box to section off each page reference and they each have their own font to separate them all out; this design at a quick analysis of the page looks relatively ok but if you look at the page in more depth then it starts to look a little crazy and messy. On the other hand to make sure this wide variation of fonts doesn’t look too overpowering the designer has only used one colour (black) instead of the usual 3; just so the fonts don’t overpower the images.
On the other hand the each artist has their own significant page number in the bottom right hand corner of their image; sans-serif black font with a white background. This could be a good way of showing the reader easily what page to look for if they have a specific interest in an artist and could be another interesting idea for my contents page. However to make the main artist image stand out from the 7 others the designer saturated the image so it would be the centre of attention quite literally. To give this NME contents page look a little more professional the designer added the date under the magazine heading as an added extra; the date is in a italic serif font to contrast with the main heading ‘inside this week’, which is in bold and non-italic. Finally to add some extra information for the reader to read the designer of the contents page created a narrow space to add in extra page numbers that may be of interest to the reader. The work ‘Plus’ above all the sub-headings is a great idea instead of using boring words such as ‘more info or extra stuff’. This writing in the narrow box is also black and varies between serif (the word Plus), sans- serif bold (page numbers) and sans- serif (other page headings). I really love the way the designer has used this rectangular gap to their advantage and have used it extremely well; this could be a good idea to use the technique if I am also left with an extra piece of space.

Mojo

While analysing this Mojo double page spread I realised that the majority of Mojos contents pages are very plain and basic so they are easier to read. For example on the right hand side of the page Mojo always seem to put a column of 4 to 5 images showing what artists will be appearing in their magazine just to give the reader that extra piece of information and making the page look more creative. The designers have also added a caption at the bottom of the 3 large images to tell the reader what page number the bands are shown. They have also made one of the images slightly forward and tilted to give the whole contents page a bit more diverse; this also has a shadow surrounding the image to make it look more 3D and attract their target audience.

Furthermore Mojo also uses the 3 colour scheme to give the contents page a professional touch. (gold, red and black) This allows the reader to focus on certain parts of the page, for example all the numbers on the page are gold and the headings of each section on the contents page are red; this gives everything its own colour scheme and makes the layout of the page easier to understand for the reader. To add an artistic vibe the designer has added a dashed black and gold line to separate off the contents sub headings from the Mojo heading at the top right corner. However the feature of the magazine next to the gold page numbers are in a sans-serif font and bold to give them a bit of definition compared to the description of each feature which is in a smaller sans-serif font as it isn’t supposed to be the main focus point for the fast readers.

The word Mojo heading has replaced the regular idea of using contents as a heading, this makes the contents page look a lot more unusual and retro which is similar to the style of the magazine. Therefore at the bottom of the contents page there is a black box with contrasting white writing (again sans-serif font) to indicate what the piece of information is informing the reader about. ”This months contributors include” The white box below introduces the reader to some artists that will have an appearance in the magazine and a small brief description on the left hand side about the musician; this box again adds a small insight of what is appearing in the magazine, this could be a good idea for using in my magazine to make it a little more formal.
Finally as any normal magazine would there is a page number in the bottom left hand corner (in bold black sans-serif font) followed by the magazine logo ‘Mojo’.

Tuesday 1 February 2011

Analysis of 5 Double Page Spreads

Q

On my first look of this double page spread it just looked way more interesting than the others. Firstly looking at the top of the left hand page the designer used a serif font which looked similar to one that you would see on a poster for a circus. This could have possibly been used to show Lady Gaga’s personality through a font; this could be a very useful technique if I’ am doing an interview of a singer with a lot of personality. Also to make this double page spread look a little more interesting the designer has ordered the image so it takes priority over the text at the very top of the left and page and also the stylish border surrounding the whole two pages. Making the Lady Gaga image oversized gives the whole DPS something extra to make your eyes drawn towards it.

While still focusing on the left hand page the font that is mainly used is a sans-serif font to possibly make the writing bolder to stand out from the image behind. This could be a good way of drawing the readers eye to the parts you want them to read the most; which Is what I may consider doing. The red sans-serif font is a great way of displaying the artists name to show the reader who the article is about, and by doing so a black smaller sans-serif font is added just underneath ‘what I’ve learned’ to stand as a slogan from Lady Gaga herself. Unlike Mojo, Q seems to want the reader to know who the interview is about; which in my opinion is the best way, this could be a good idea for when I make my own. Following on from this I really like the way the zig zag line is joining both pages together to look like they are joined. This technique may inspire me to do something similar in the next few weeks. Also the same as Mojo, Q adds their own logo in the bottom of each page beside the page number to add that little extra something; along with their website address for commercialism.
For Q’s right hand page they only seem to use 2 colours (black and red) with the small exception of white for the page numbers inside the black boxes. This works really well for this magazine as it is closely connected to the left hand page. To give this double page spread a variation of fonts the whole right side is serif font to make it look a little more formal. The only way the designer varies the font is by changing the colours. The sub – headings are in red to make them stand out from the main body of the interview. The red text is from the interviewer and the black is from Lady Gaga; this is a good way of separating out each section of the interview which could be an idea for my DPS.
At the top of the page the main heading is an introduction from the interviewer about Lady Gaga which stands out greatly because of the larger font size. Below this there is writing in a smaller serif font introducing the photographer (portrait) Rennio Maifredi and the interviewers name in also in bold Rupert Howe. This in turn adds a little something extra to making this double page spread so classy.
Finally in the center of the right hand page there is a bold red serif font, larger than any other on the page with a statement from Lady Gaga saying what she wants the most. “My ultimate goal? I want a Lady Gaga exhibit at the louvre.” Just by adding this makes the double page spread that little bit more interesting giving us an insight into what Lady Gaga wants from her career.
NME


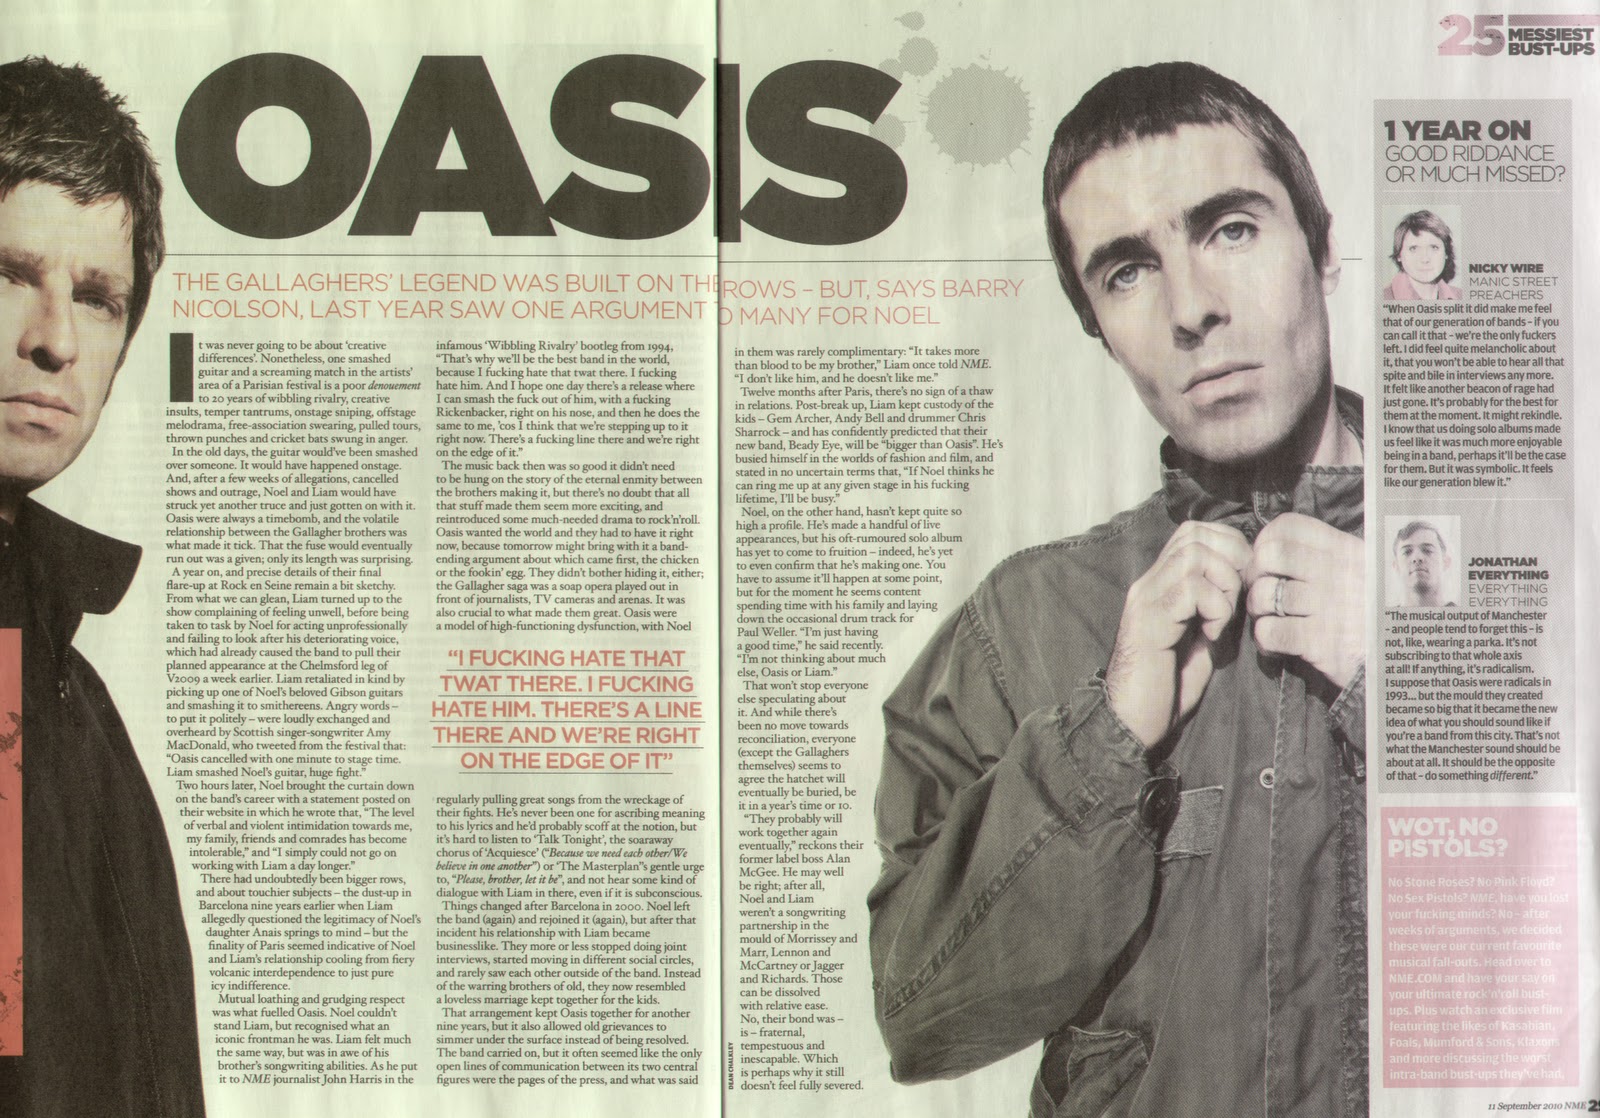
 While analyzing this double page spread I realized that NME always seem to use the same sort of background colours with similar genres of music e.g. The Wombats and this Oasis interview. The particular background on the Oasis double page spread is very plain which makes the two band members stand out a lot more; this also works for the font as well. Furthermore the size to the sans-serif font used is a lot larger than the standfirst and is also in bold and black to make such a short band name look that little bit larger. Possibly the best added touch was the 5 grey paint drops whish just give the DPS that added touch showing that oasis are a rebellious band, the grey drops also connect with the same colour scheme as the text (black, red and grey) which gives the interview a professional thought about design.
Furthermore by adding the black horizontal line above the standfirst gives the double page spread as sense of less chaos so everything isn’t clumped together, this also works with the separation of the second column by adding a comment from the lead singer of Oasis; which has been highlighted in red and underlined to show the reader this is important statement to read and has some significance to the article, which could be a good idea to add into my music magazine.  Although strangely there is a grey and red box on the right hand side of the right page, this is unusual for a NME magazine to do as I haven’t seen it in past DPS. The boxes are mainly there to give extra information about other artists that may not have been mentioned on other pages. This could be a good way of adding in extra information but I’m not sure if for my music magazine that the added box will detract the attention away from the main story. On the other hand this DPS is in a way a lot different from others of NME, normally the band or artist is either on the right or left page with the writing on the opposite; but here the artists are surrounding the interview almost showing that they own this page. Other conventions that are similar to past music magazines I have analyzed are the bold ‘I’ at the start of the 1st column, this just adds a little something extra to not make the article appear boring or the band for that matter.
Finally while looking closer at the double page spread I noticed a piece of text saying ’25 messiest bust-ups’, this give the reader a little insight into what the DPS will be about before they start reading; it also that professional touch and shows the designer hasn’t missed anything out and allows the article to be read with ease. As normally seen on any page in a music magazine there is also a page number locater in the corner of each page along with the logo of the magazine; this is a definite must for my music magazine as it can allow the reader to find the page they are looking for easier.
NME

While analyzing this double page spread I found certain aspects of it to be very appealing and this gave me some inspiration for mine also. Parts of this magazines spread that I loved were the way the designer used the 3 column rule; this in my opinion gives the magazine a professional edge and makes it a lot easier to read therefore making it more appealing to the reader. For my double page spread I will certainly use this rule as I think it will create that professional and modern style to my magazine. Furthermore another aspect of the spread that will appeal to my style of magazine is the standfirst just below the bold heading. I love it how the font changes from sans-serif to serif while not detracting the eyes attention away from the smaller fonts below. The serif font will defiantly appear in my magazine as I want to really relate my indie pop magazine well to my main inspiration NME.
On the other hand I’m not too keen on the “Now we’re dickheads with synths” taking over the top 5th of the page, this space could have been used for a title introducing the reader to the band; in this case The Wombats. Instead the band’s name is in a smaller serif font below the title. Keeping with the ideal double page spread the picture spreads over the whole left hand page, but also connects to the right hand side page because of the similar colour scheme between the sky of the picture and the page colour of the right. Showing that both band and writing are connected through correlating backgrounds. This technique in my eyes works very well and may come up in my DPS also as it seems to work well with lighter backgrounds.
To start off The Wombats article the first column begins with an oversized O, in my opinion I think this gives the band a slight edge and makes the readers eyes know where they need to start reading just from the bold sans-serif font used. This use of variety could also appear in my magazine to add a sense of excitement and make the reader think of it as an NME magazine with an added touch.
Finally, one of the common tactics used by the designers of the NME magazines is to stick with a specific colour scheme so the page doesn’t look to over busy. By doing so designers only use a maximum of 4 colours, in this case of The Wombats double page spread they only use black, a slight aqua blue and possibly white; this use of 3 colours is continually based through all NME magazines and would be a great idea for my own magazine.
Mojo

While analyzing the double page spread interviewing Paul McCartney I noticed Mojo’s choice of lay out and colour scheme was a lot more basic than the others I had analyzed. The typical codes and conventions are totally different from the regular standard ones we see in other music magazines; but this is what makes this double page spread so interesting. Firstly instead of having the typical 3 column convention this magazine designer has only gone for two; this may work in this DPS but I’m not entirely sure it will in mine. On the other hand I do really like the added touch of the large R and F as a new paragraph begins; this is rather common for a designer to do to just give the DPS a little bit more creativity.
Still focusing on the left hand page where I was particularly focused on the line ‘StartingOver’ normally in a music magazine that would span over the whole of the top 5th of the two pages; but that’s what makes this DPS so rare the designer has added more of a 80’s style taking us back to McCartney when he looked like he does in the image on the right page. Furthermore the colour scheme does fit the style icon of a music magazine by having the three colours. (white, green and black) This works effectively by contrasting the white and green against the black background, and therefore connecting the green to the logo of an apple in the top left corner. Under the heading Starting Over which is in a sans-serif font there is a block of text (a standfirst) which gives the reader a brief outline of McCartney’s life and what he told us. This block of text is a good idea to start off an interview by just giving the reader a brief insight to what the interview is about; I may decide to use this technique for my DPS. The font used for this block of text really makes it stand out the serif italic font is a great technique used for a chunk of text when someone is talking; it will really grab the attention of the reader and create a diverse font scheme.
Finally moving onto the right hand page, where the colours are very dark and there isn’t that much brightness in the image it’s self. Although the black shadow at the bottom of McCartney almost connects with the background of the text on the left page; I really want to try and achieve this technique used by the designers in my double page spread. Even though the image of Paul McCartney is very dark it almost looks like it’s supposed to be that way to show the reader it connects with the block of text on the left hand page. Overall this is a very simple DPS design but in some ways works very well as a comparison to some of NME’s double page spreads; where they are a little more outgoing.

While analyzing this double page spread it appeared to be very different from a typical DPS, normally there are 3 columns to the right hand side giving a interview with the band or info if they are new to the charts. This in my opinion doesn’t work as well as is seems to be more restricted and squished to one side. Another part of the right hand page I wasn’t to sure about was the aqua blue circle in between both columns giving a small statement. “B&S began the left-field holiday camp” Although this adds a little something more adventurous to the right hand page it just doesn’t seem to fit in with the colour scheme or the writing around it. If I was going to use this technique for my double page spread I would prefer to use a square of rectangular shape so the writing will fit more easily around the columns.
Still looking at the right hand side of the page, I seemed to notice the words ‘FILTER LIVES’ in the top right hand corner. I really like this extra touch as it gives the reader an insight into what they are going to be reading about before reaching it. Also in the lower right hand corner there is a small little page number along with the magazine name Mojo; these little additions make the magazine seem that little bit more formal compared to the front cover, which could be a good idea when making my own magazine. Unlike other magazine makes Mojo seems to be a little bit more simplistic which does work in some ways i.e. making the image stand out more and the title to the double page spread. As it is typical of magazines to use a 3 colour scheme Mojo has also done the same by using a badge colour for the standfirst, black for the main section of the DPS to make it stand out more to the readers and white for the statement inside the blue circle; this technique will defiantly be used in my magazine. Instead of the blue circle being the only cold colour on the page the designers also added the same colour to the word ‘LIVES’ from the two words in the top right hand corner ‘FILTER LIVES’ just to make it seem like it connects with the page that little bit more.
On the other hand the left hand page is a lot more of a simple design the whole page is taken up by the lead singer of the band Belle and Sebastian’s Jerry Garcia. Most magazines like Mojo only seem to focus the reader’s attention to the main singers of bands as they are the most well known. For my magazine I think I will make up a band and try to portray the same effect that the designers of this magazine have. Also in the case of this double page spread there is a small sans- serif font in the top left hand corner giving the reader information of where the band where playing, or in this case who is in the image. The white font is a good colour to use with the brownie orange background as it appears to stand out a lot more; this could be a good idea for when I come to make my double page spread. Furthermore the colour of the image (sepia effect) really shows that it connects with the writing on the opposite page, by using the same font colour for a small block of text on the top right of page.
Mojo

While analyzing this double page spread it appeared to be very different from a typical DPS, normally there are 3 columns to the right hand side giving a interview with the band or info if they are new to the charts. This in my opinion doesn’t work as well as is seems to be more restricted and squished to one side. Another part of the right hand page I wasn’t to sure about was the aqua blue circle in between both columns giving a small statement. “B&S began the left-field holiday camp” Although this adds a little something more adventurous to the right hand page it just doesn’t seem to fit in with the colour scheme or the writing around it. If I was going to use this technique for my double page spread I would prefer to use a square of rectangular shape so the writing will fit more easily around the columns.
Still looking at the right hand side of the page, I seemed to notice the words ‘FILTER LIVES’ in the top right hand corner. I really like this extra touch as it gives the reader an insight into what they are going to be reading about before reaching it. Also in the lower right hand corner there is a small little page number along with the magazine name Mojo; these little additions make the magazine seem that little bit more formal compared to the front cover, which could be a good idea when making my own magazine. Unlike other magazine makes Mojo seems to be a little bit more simplistic which does work in some ways i.e. making the image stand out more and the title to the double page spread. As it is typical of magazines to use a 3 colour scheme Mojo has also done the same by using a badge colour for the standfirst, black for the main section of the DPS to make it stand out more to the readers and white for the statement inside the blue circle; this technique will defiantly be used in my magazine. Instead of the blue circle being the only cold colour on the page the designers also added the same colour to the word ‘LIVES’ from the two words in the top right hand corner ‘FILTER LIVES’ just to make it seem like it connects with the page that little bit more.
On the other hand the left hand page is a lot more of a simple design the whole page is taken up by the lead singer of the band Belle and Sebastian’s Jerry Garcia. Most magazines like Mojo only seem to focus the reader’s attention to the main singers of bands as they are the most well known. For my magazine I think I will make up a band and try to portray the same effect that the designers of this magazine have. Also in the case of this double page spread there is a small sans- serif font in the top left hand corner giving the reader information of where the band where playing, or in this case who is in the image. The white font is a good colour to use with the brownie orange background as it appears to stand out a lot more; this could be a good idea for when I come to make my double page spread. Furthermore the colour of the image (sepia effect) really shows that it connects with the writing on the opposite page, by using the same font colour for a small block of text on the top right of page.